
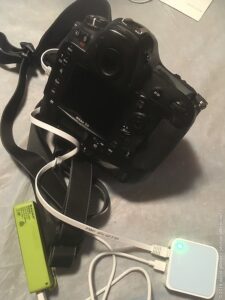
A friend recently asked me to help on a commercial shoot of some apprentice jockeys. She had been given a fairly clear brief consisting of a range of varying shots and I realised it would be helpful for the client to be able to see the shots as we shot them. This would be straightforward when shooting with my camera: I already use a Eye Fi SD card which is paired to my ipad. My friend uses a Nikon D4 but I couldn’t simply pop my Eye Fi card in that because it has no SD card slot.
I then turned to the internet to see what other wifi options existed for the D4. The camera has an inbuilt ethernet network connection so we could have just cabled the camera directly to a laptop but that didn’t seem very practical for an outdoor shoot that might involve moving between different locations. She could have purchased the official Nikon wifi component for the D4 but the official retail price for that is $US599 (!) which is beyond absurd. After a little searching, I found someone describing a hacked solution using a small USB-powered wireless router and an ethernet cable. This seemed like a more promising approach.
The webpage that describe the “hack” was a few years old so I then went searching for some cheaper contemporary solution. I settled on the TP-Link WR802N router, which is available in local computer shops for around $35-40.
This router is pretty small – it fits in your hand and easily slips into a pocket. It comes with a little wall power pack but all this does is output a 5V USB powered connection, so I knew I could easily replace this with a USB power pack that I’d normally carry around to recharge my smartphone. That seemed to satisfy the basic requirement of simple portability.
Reading some reviews of the WR802N, a common use of it was to cable it into a wall network outlet in a hotel room to create an internet wifi hotspot in the room. That wasn’t useful to me as all I needed was a non-internet wifi network for my iPad that could also be connected to the D4 with a cable. Fortunately, the WR802N can be configured a number of different ways so I just needed to reconfigure it to use the “access point” mode. This would create a standalone network for a variety of wifi devices and one ethernet-connected device.
To configure the WR802N, all I needed to do was connect it to power and then connect to it’s wifi network with my laptop using the network password printed on the back. I could then use my web browser to connect to the admin console and walk through the process of turning it into an access point. The only change I made was to personalise the name of the wifi network. I then had to reboot it for the change to take effect.I could now connect my iPad to the new custom wifi network. Connecting the camera was as simple as plugging an ethernet cable into both camera and router.
The next step was to figure out how to get the two devices to talk to each other. The first step was to simply enable the “Network” menu option in the camera which is normally turned off.
The next step was to create a network profile. The camera provided 4 options for this but I settled on 2: the HTTP and FTP options.
The HTTP option starts a web server on the camera itself. You can then use a web browser on the same network to connect to the camera using a login/password defined in the profile options. The camera web server provides basic remote control functionality: you can view the photos on the camera and you can also control the camera in shooting mode, allowing you to change basic camera settings (eg. AF mode, white balance, etc) and to also trigger the shutter to take a photo. This seemed useful but the very basic interface perhaps wasn’t the best for passing the ipad to the client during our shoot.
On my shoots I like to use the Shuttersnitch application which is optimised for retrieving photos from wifi devices and presenting them in a useful way. The setup guide in the app gave me basic information on how I would need to configure the camera to connect to the FTP server running inside Shuttersnitch.
So now I needed to create a FTP profile on the D4, giving it the ip address of the ipad and the login/password required for Shuttersnitch. At this point I realised that the router was allocating semi-random ip addresses to connected wifi devices. Specifying an ip address in the camera for the ipad might work fine now but what if the ipad was given a different ip address next time? The camera would need to be reconfigured with the new iPad address. That would be a pain, especially for non-technical friend.
Fortunately, the router console tool allowed me to tweak the DHCP server settings to allow the allocation of static addresses. I added the hardware (mac) addresses of the ipad and D4 to the router so they’d always get the same network addresses when they connected. This would make it easy for the D4 to find the ipad FTP server but as a bonus, it also meant that the ipad would always connect to the same address when the D4 HTTP profile was used to control the camera.The next problem was the port number used by the Shuttersnitch app: it uses port 26000 rather than the standard FTP ports of 20/21. The guided setup in the D4 menu didn’t allow a non-standard port number to be specified so the setup process would fail with a ‘can’t connect’ type of error. Fortunately, the camera allowed me to save the non-working FTP profile and I could then edit the profile manually to access and adjust the port number.
I also adjusted the FTP settings in the camera to specify how it should send files. The main changes were to ensure that “auto send” was enabled and only JPG files would be sent. We would shoot RAW+JPG to get the highest quality files but for our purposes, sending the RAW files over the wifi was only going to slow it down and use excessive space on the ipad.
At this point, I could connect the iPad to the portable network, start up Shuttersnitch and start shooting images with the D4. There was a slight delay but the images started arriving in Shuttersnitch as required. Beautiful!
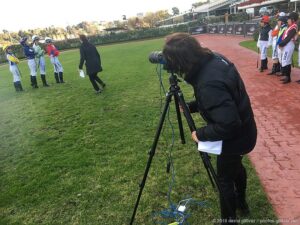
On the day of the shoot we mostly used the camera on tripod and left the router and it’s little battery pack lying on the grass underneath. We could have easily shoved those into a jacket pocket if we had needed to be more mobile. The client seemed to love being able to see the images as we shot them, but that works both ways: having the client involved in the process gave both of us the confidence that we were getting what was required.
The setup for this is a little bit clunky because you always have a cable running out of the camera. Maybe the little router could be gaffer-taped to the camera somewhere but you still have the problem of the USB power pack. I didn’t investigate whether the router could simply be powered off the micro-USB socket on the camera but that may have made things more complicated. Shoving the router and power pack into a pocket means you only need the one cable running from your pocket to the camera.I would have liked to be able to use the Nikon WMU smartphone app to control the camera but that doesn’t appear to be compatible with the D4 and even if it was, I probably would have needed to figure out how to configure this solution to work with it. While we didn’t use it, I was able to easily pair my laptop to the D4 using the wifi connection for conventional studio ‘tethered’ shooting.
This ‘hacked’ solution is a little more complicated than I’d like (a small router with built-in battery would be better) but there’s clearly a big cost saving compared to the official Nikon wifi module. This was $39 for the router, $10 or so for a basic USB battery pack (if you don’t already have one) and then maybe a few dollars for an ethernet cable. That’s about $50 versus the official Nikon solution at $500+. Hopefully in years to come all cameras will ship with inbuilt wifi as standard (as smartphones do now) so that there’s no need to spend extra money on portable routers, Eye Fi cards or overpriced manufacturer add-ons.
It seems that the Nikon D4S and the Nikon D5 also lack inbuilt wifi but I’d say this solution could also be used with those cameras. There is nothing particularly model-specific about adding this router to the ethernet port of any camera but the software interface options (like the FTP and HTTP servers here) may vary.