
(this is part 2 of my “buying your first flash” post)
In my previous post, I suggested buying the following equipment:
- Godox TT685 speedlight
- Godox XPro radio trigger
- Godox 60x060cm softbox kit with S-type bracket
- Godox 260T lighting stand or similar
In this post I’ll discuss setting up each one so that you can get started taking photos.
Lighting stand
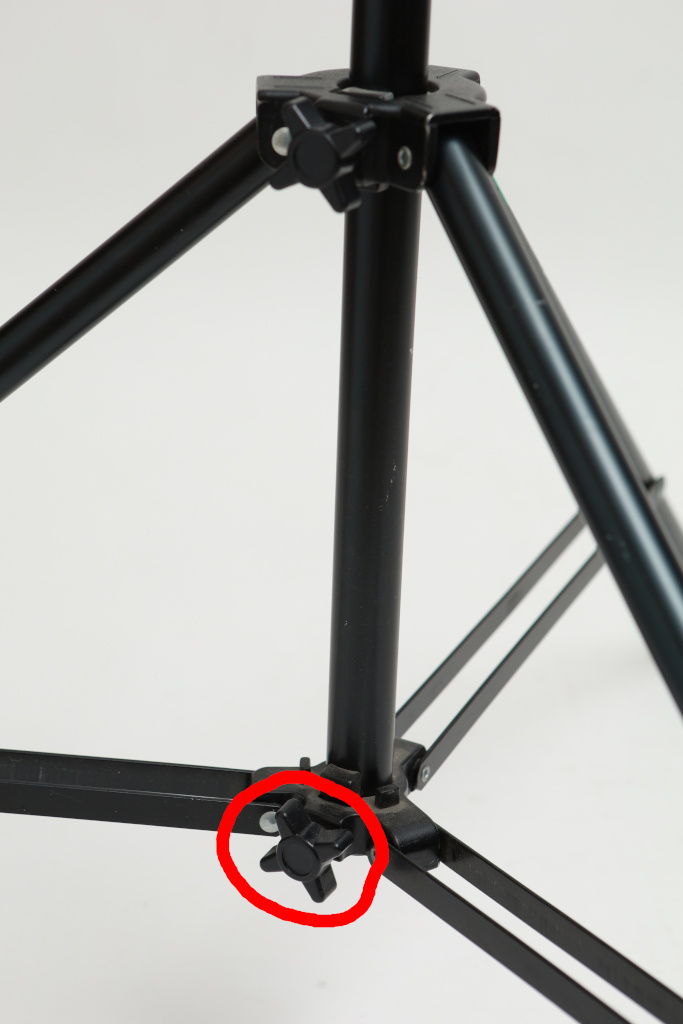
There’s little to explain in setting up a lighting stand. You want to undo the knob/screw that releases the leg mechanism and slide it until the legs are as wide as possible. The end of the centre column should be off the ground so that all of the weight rests on each of the 3 feet.
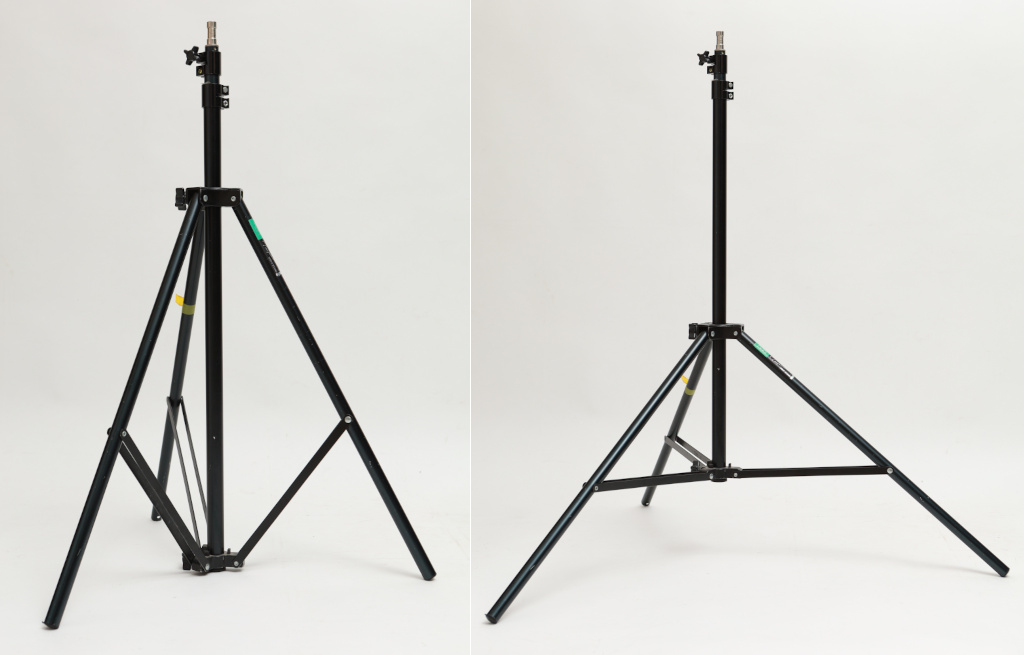
If your stand has an adjustment knob at the bottom of the centre column you shouldn’t need to touch it at all. It won’t help you open/collapse the legs.
You can setup the stand a couple of metres from your subject. As you’re going to light your subject with your new lighting gear, you probably want to set it up indoors or in the shade as you don’t want to be fighting the overly bright power of direct sunlight.
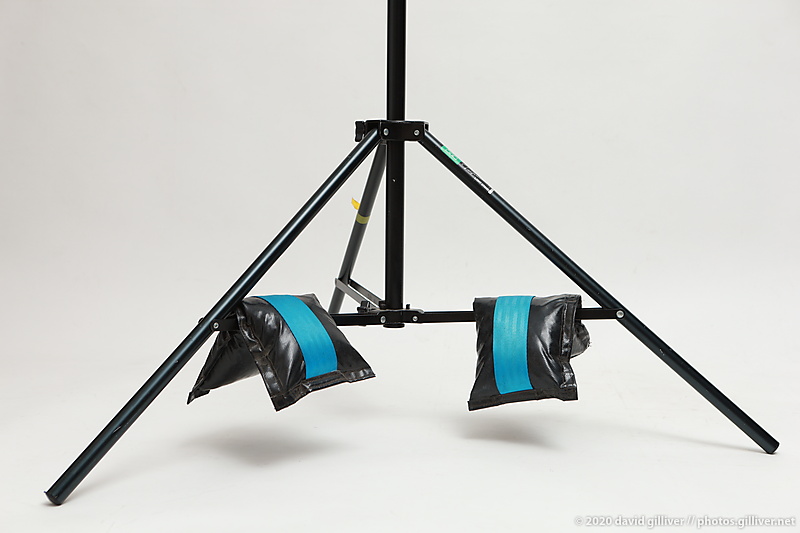
It’s always a good idea to add a sandbag if you can. It’s protection against a gust of wind or someone bumping into the stand. It doesn’t really matter what you use as long as it’s heavy and it keeps the centre of gravity low. I’ve heard of photographers improvising with ankle weights. There’s no such thing as too much stability so don’t be afraid of using more than one.
S1 S-type bracket
The next step is to put your S-type bracket on top of the stand.
Unscrew the tightening screw on the bottom of the bracket until you can no longer see the screw inside the sheath:
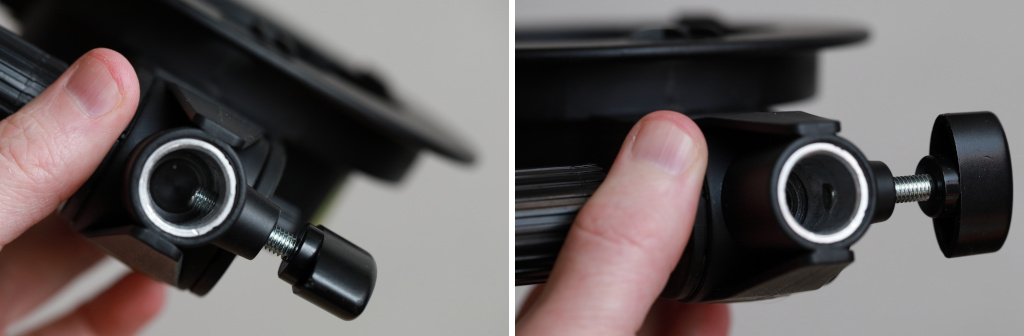
You can then put it on the stand so that the screw sits below the top lip of the spigot. Partially tightening it will reach a point when the bracket will still move but the lip of the spigot will stop it from being pulled off the stand. You can then tighten it all the way.
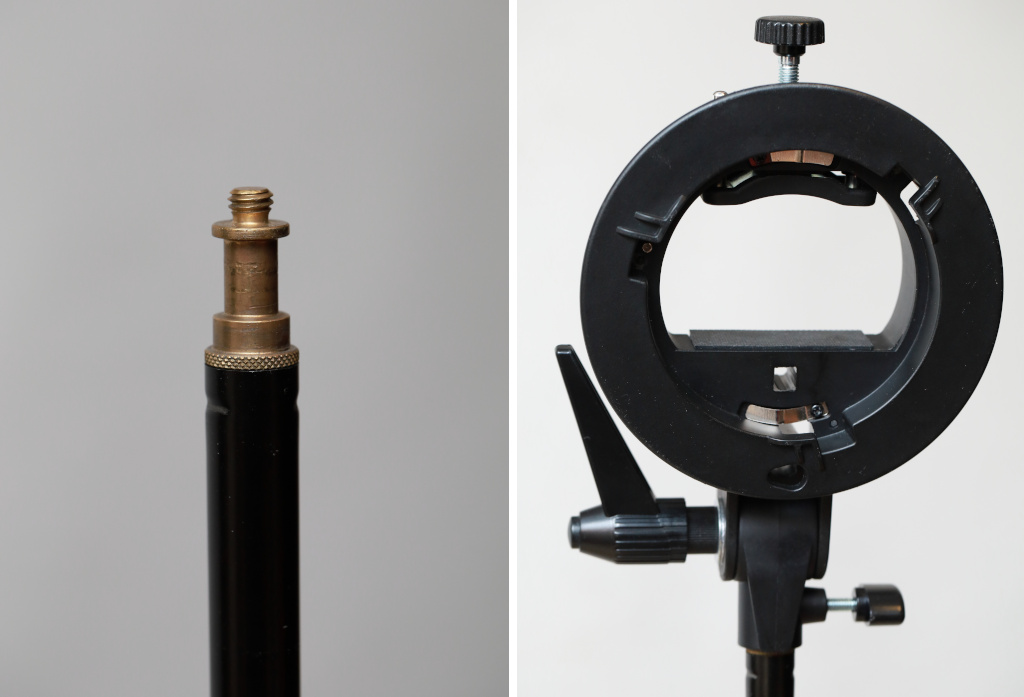
The large handle should be tightened to stop the bracket swiveling. This will make it easier to add the softbox and speedlight.
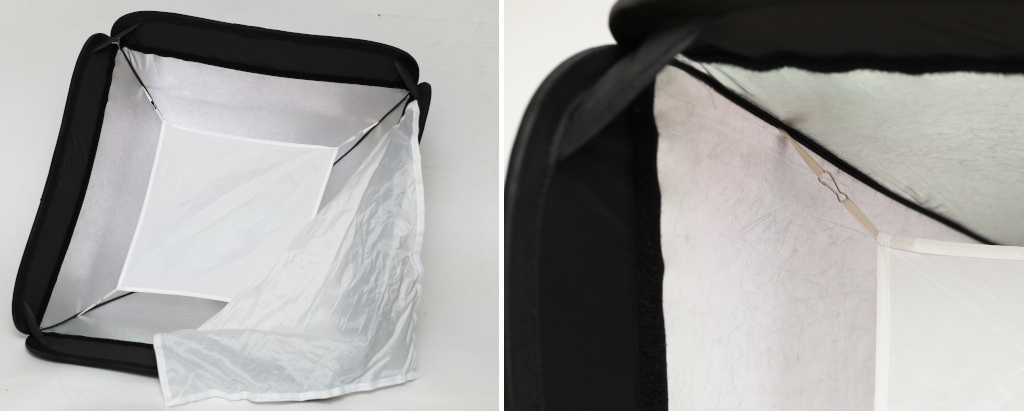
60cm Softbox
A brand new softbox will come in 3 parts: the softbox shell plus two white diffuser panels. The smaller panel fits inside the softbox and the larger panel attaches to the front.
The smaller panel attaches to 4 small hooks inside.
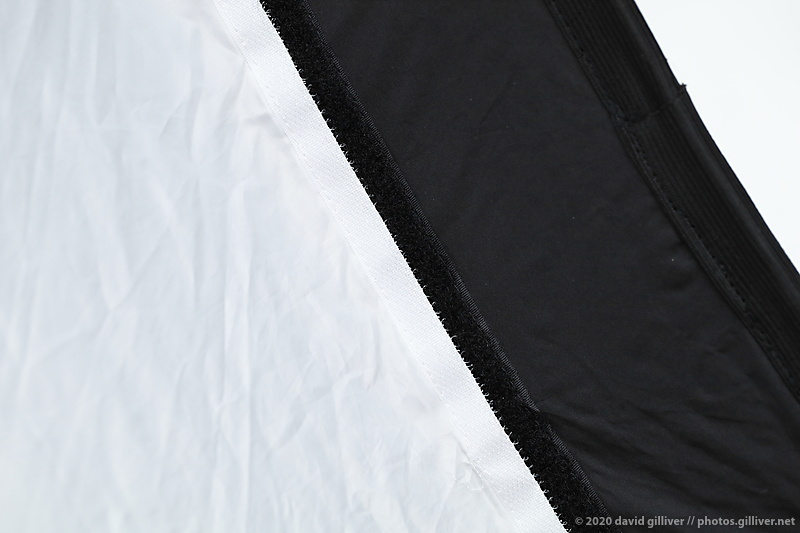
The larger panel attaches via velcro to the front. If you intend to use a grid on the softbox, make sure you leave space on the outside of the softbox velcro to also attach the grid later.
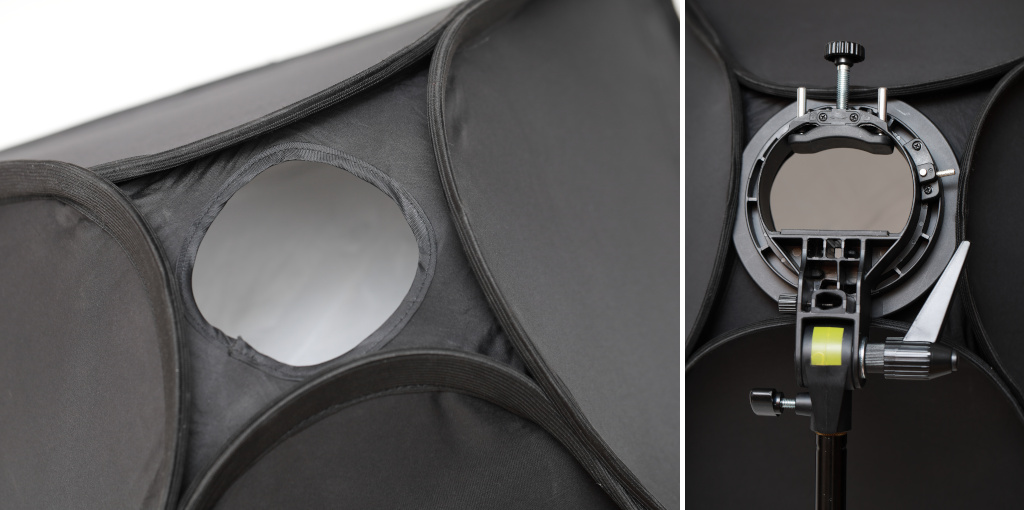
On the back of the softbox you will see a round hole in the black fabric. This hole is for the speedlight to poke through. It is not the part that clips over the edge of the S-type bracket – it’s way too small. Attaching the softbox simply involves clipping the edges of the 4 panels over the round edges of the s-type bracket. The first three should clip over fairly easily but the fourth will require a little more force.
TT685 speedlight
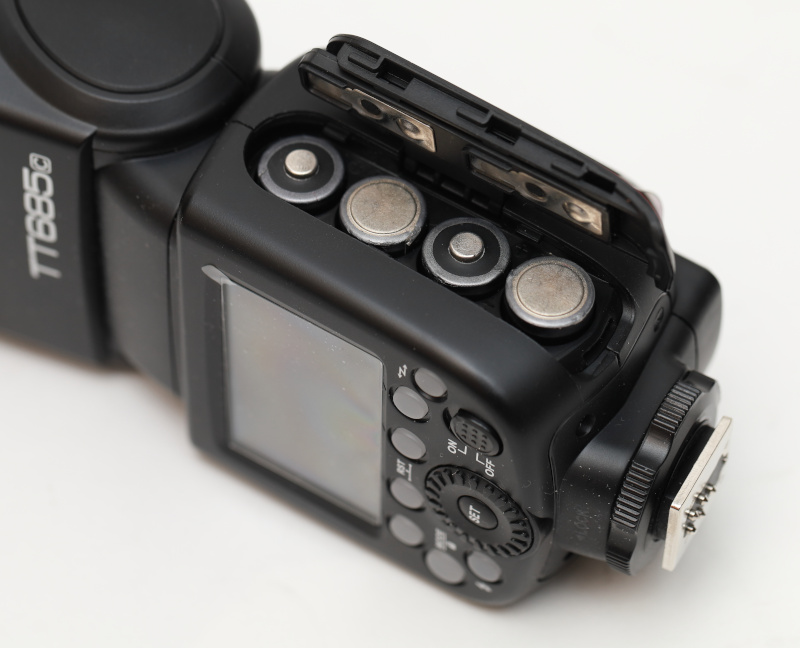
Inserting the 4 AA batteries is easy – slide open the side panel in the direction of the arrow. Drop the batteries in and push/slide to close the battery panel.
There are a bunch of buttons on the TT685 and a bunch of symbols and numbers on it’s LCD screen. It can be very confusing.
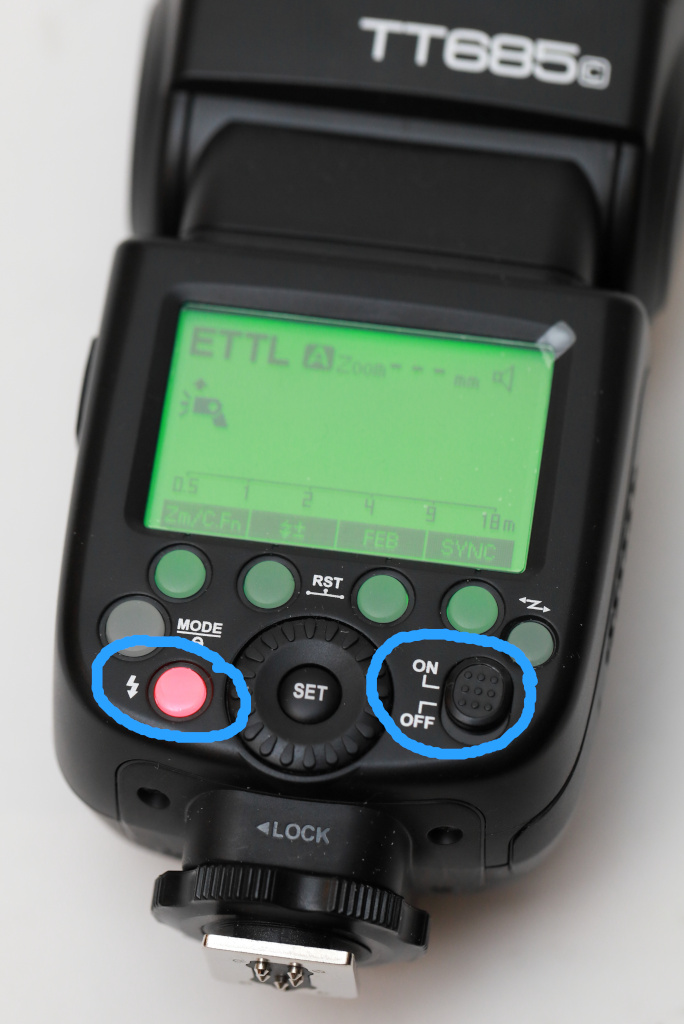
To turn the flash on, slide the on/off button up. The screen should light up and a few seconds later the test button at left should glow red. If you tap it, the flash should fire to confirm it’s working. If the red light takes a long time to start glowing (or doesn’t glow at all), you need a fresh set of batteries.
Fortunately, you only need to press the control buttons on the flash when you’re setting it up. Once you have it setup with your softbox, you can control everything from the XPro trigger on top of your camera.
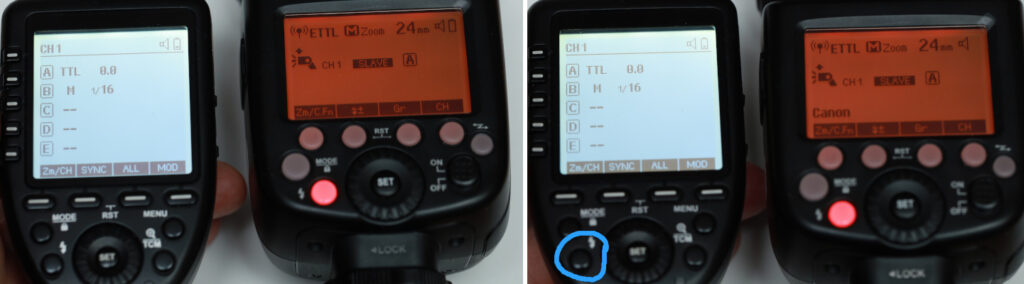
Below the LCD screen on the right there is a button marked with a sideways lightning bolt. This button is used to cycle through the different triggering modes. Tap this button repeatedly and it will go through various orange and green screens.

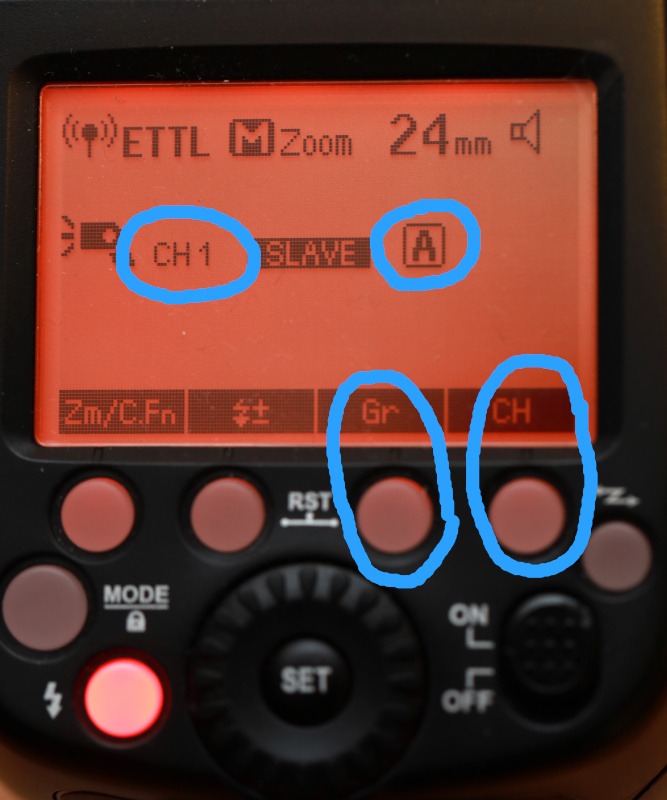
The screen we’re looking for will be orange (indicating slave mode). There are two versions of the orange screen, one for optical triggering and one for radio triggering. To use the XPro trigger, we want radio triggering. The radio triggering mode is indicated by a radio antenna symbol in the top left of the screen. Keep tapping the sideways lightning button until you see an orange screen that says “SLAVE” which has the lollipop radio symbol.
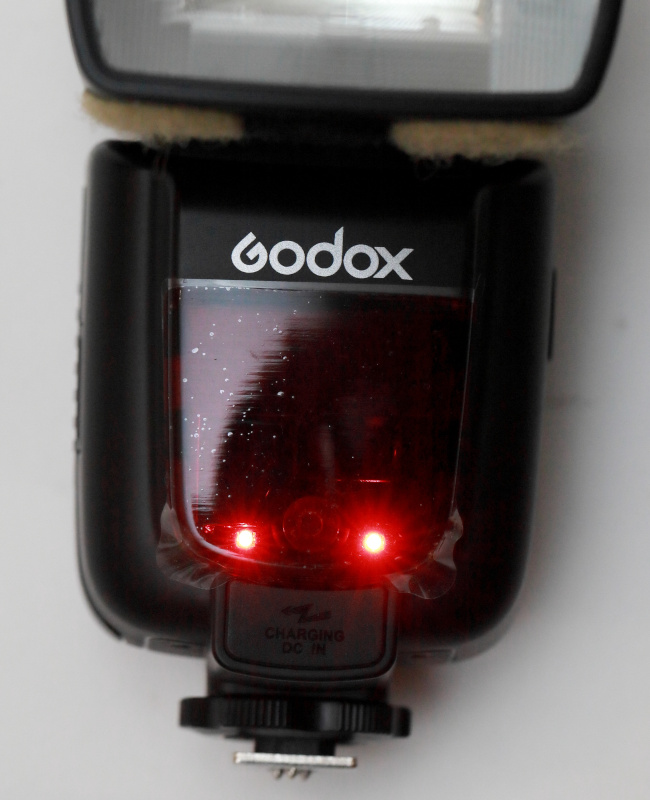
If you flip the speedlight over, you should now see two pulsing red lights on the front. These indicate the flash is turned on and in slave mode.
Your trigger will only work with the speedlight when it’s sending a signal that’s on the same channel and group. At this stage it doesn’t matter which channel and group you’re using but you do need to note the settings on the speedlight. If the flash is brand new it will probably say CH 1-SLAVE-A (which means it’s in slave mode on channel 1, group A).
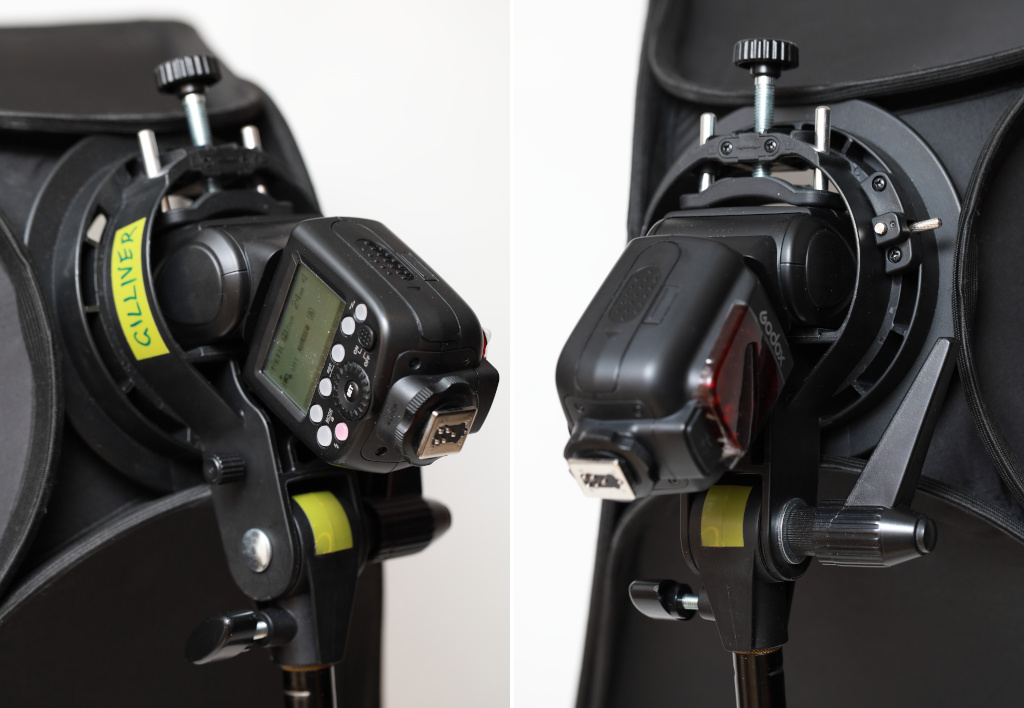
To add the speedlight to the softbox, you open the s-type bracket and slide the speedlight head into the large hole. You then turn the knob to clamp the speedlight in place. You want the clamp to be tight and firm but not so tight that you risk crushing the plastic and electronics of the flash bulb.
XPro radio trigger
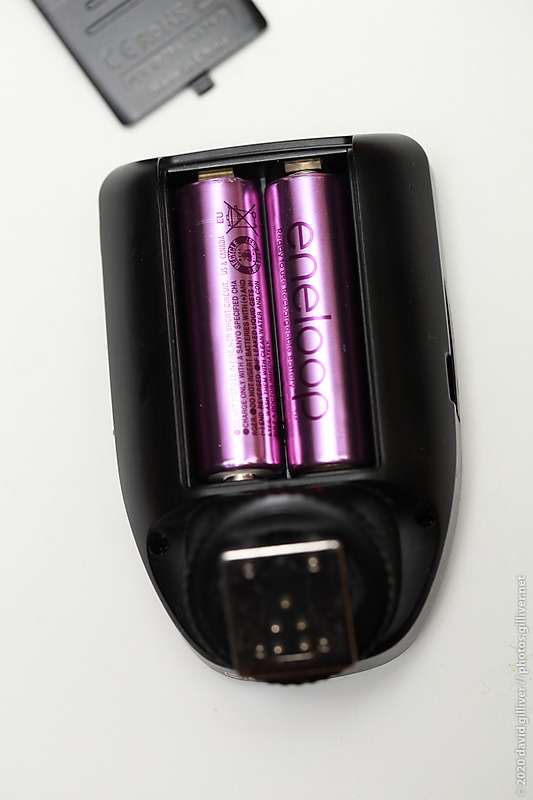
The XPro trigger takes 2 AA batteries. Flip the XPro over, slide the battery panel off, insert the batteries and slide the panel back on. I recommend using Eneloop or Ikea LADDA batteries.
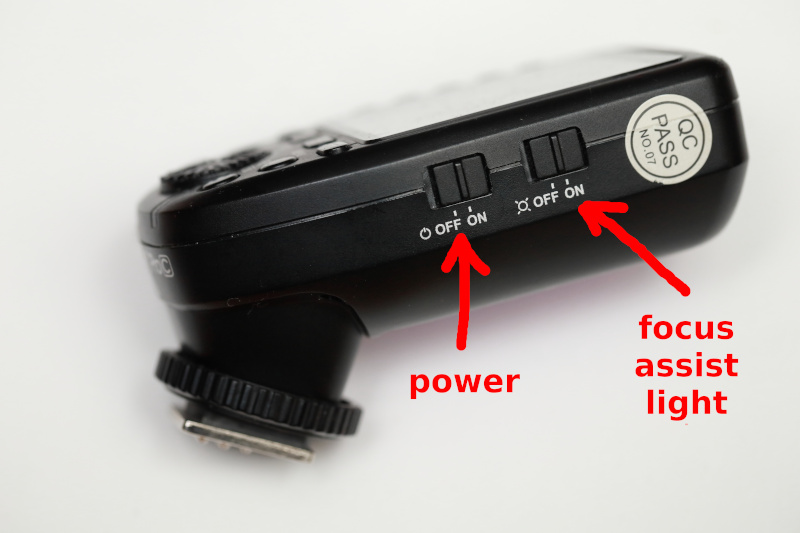
On the side of the trigger, there are two sliding buttons. One is the power button and the other is the auto-focus assist light. Slide the power button on.
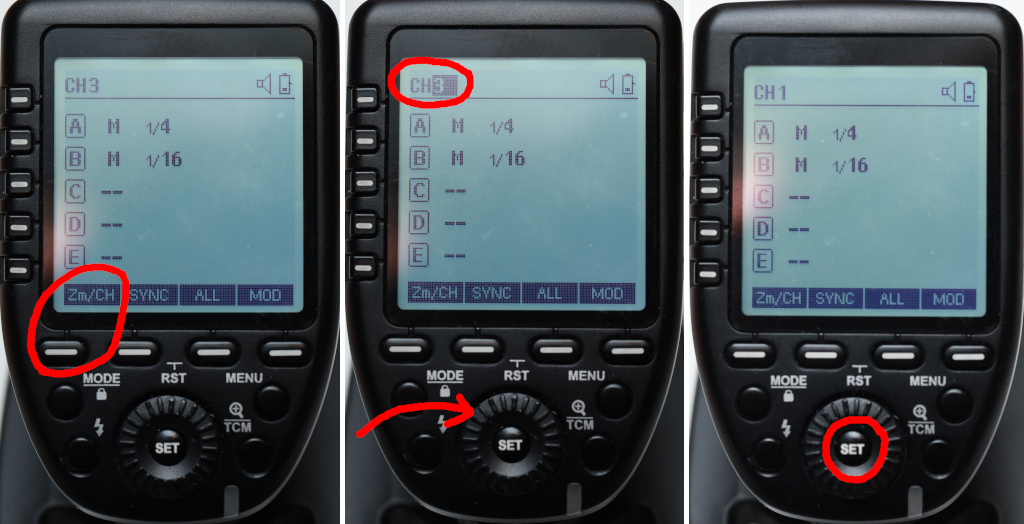
You now need to make sure that your trigger is set to the same channel as your speedlight. Check the top left of the screen. If it says “CH 1” you’re ready to go. If it’s set to a different channel, we need to change the channel to match the speedlight.
The button to change the channel is just below the LCD screen on the far left – it’s labelled “Zm/CH” on the screen. Hold this button down for a few seconds until the “CH” number in the top left is highlighted. You can now rotate the wheel around the SET button to choose the channel to match your speedlight.
Your trigger can fire multiple flashes simultaneously. That’s why it has buttons labelled A, B, C etc on the left of the screen. In this case, we only need to fire the group that matches your single speedlight.
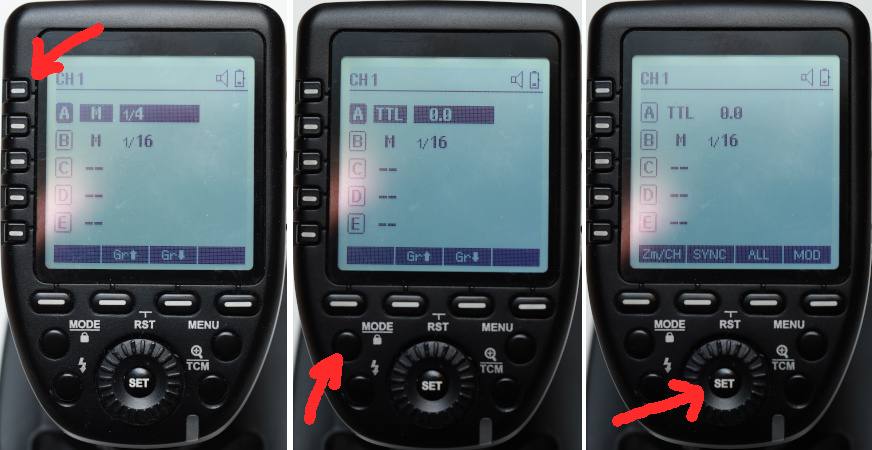
We’re going to set your flash to work out the power level automatically. In the world of flash technology, “automatic power” means setting the flash use “TTL” mode.
To do that, tap the group button at left for your speedlight (eg. tap the A button if your speedlight is set to A). The line for that group will be highlighted. You can now tap the MODE button to cycle through the different settings. When you see “–” the group will be de-activated and won’t fire. Keeping hitting the MODE button until it says “TTL”. You can then hit the SET button to lock it in.
At this point you now have the channel and group set to match your speedlight. It should be ready to test fire.
On the left of the SET button/wheel there’s a button labelled with a vertical lightning bolt. This is the test button. Tap it once and your speedlight should flash. Hurrah!
Camera settings
You can now slide your trigger onto your camera confident that the communication between your flash and trigger is working.
Dial in these settings on your camera:
- mode: manual (M)
- film speed: ISO 100
- shutter speed: 1/200s (if it only goes to 1/160s or 1/180s, that’s fine)
- aperture: f/5.6
- white balance: daylight/sunlight
Turn the trigger off and take a test photo. The flash won’t fire but you will now have a idea of the amount of available light in your exposure. If you’re indoors, the photo should look pretty dark.
If it looks overexposed, you’re getting too much ambient light and when your flash is turned on it will only make that problem worse. Adjust your aperture to f/8 or f/11 and try again. Don’t change your shutter speed to fix it as that does weird things when you’re working with flash.
When you have the ambient light under control in your exposure – and that may mean the photo comes out dark – you can now turn on your XPro and try another test shot. The flash should fire and your subject should be correctly lit. With the TTL mode set on the trigger, the flash should have been able to guess the correct power setting for the flash.
What power setting did your speedlight choose? You can use the TCM feature of the XPro trigger to find out. On the right of the SET button/wheel you’ll see a button marked with a magnifying glass, a line and TCM. Hold down this button for a few seconds and you should see the TTL on your group change to M (manual) with a fraction beside it.
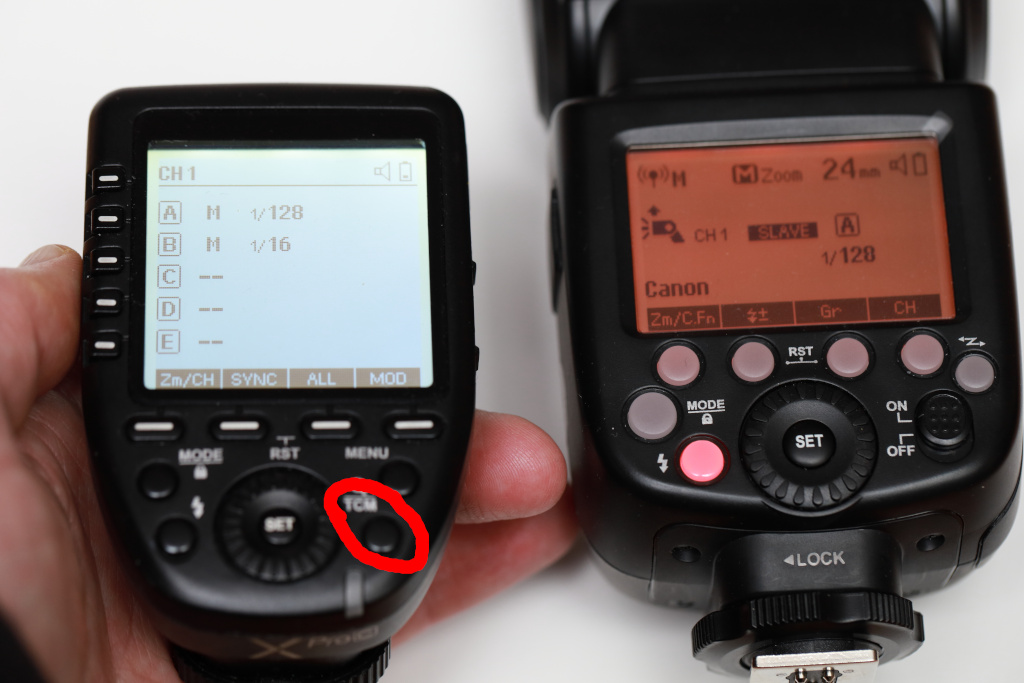
The fraction could be any number from 1/1 (full power) to 1/128 (minimum power). Your trigger will now use that power setting for every photo, until you change it back to TTL or manually adjust it to a different value. If you want to go back to shooting with TTL (auto) power, tap the A button at left and tap the mode button until A indicates “TTL” again.
At this point you’ve got a flash setup and firing when you take a photo. Now it’s time for you to start playing. Get someone to pose for you. Set it up for a self-portrait. Point it at a pot plant. Move the light around and see what happens to the shadows. Setting it up may have been a little intimidating at first but once you’ve done that a few times it’s pretty easy. All you need to do now is practice, practice, practice, practice…
Troubleshooting
A few things to try if you are having trouble with your flash…
- My speedlight fires when I press the red button on the speedlight but not when I tap the test button on the XPro:
- Check that you have the channel and group set correctly on the XPro trigger.
- Check that the speedlight has an orange screen with the lollipop symbol in the top right.
- My speedlight fires when I test fire it using the button on the XPRo trigger but it doesn’t fire when I take a photo with it on my camera:
- Make sure the XPro trigger is pushed firmly into the hot shoe on top of the camera. If the metal contacts don’t line up, it may not fire correctly.
- Your camera may have the hotshoe on top of your camera turned off. Check the camera menu for the flash settings. For example, a Nikon should have the flash mode set to fill flash.
- My flash photo is way too bright:
- Turn the flash off and take another photo using the exact same camera settings. If that’s too bright, you’ve got too much ambient light and you need to get that under control before adding flash to the scene.
- Flash power is affected by aperture and film speed (ISO). Close your aperture down and/or move your ISO towards ISO 100.
- I’m getting weird stripey banding across my photos:
- Flash doesn’t usually like it when you use a camera that is using electronic shutter mode. Change the camera settings to ensure it uses the mechanical shutter.