

Lighting stands are usually the simplest part of a lighting setup. They’re not asked to do much except deal with the consequences of gravity. You could say they play a supporting role (ha!).
Most people will buy a stand based on price. If you’re more discerning you might worry about how tall it is or whether it’s air-cushioned. There aren’t a lot of features to consider. You might glance in the direction of a c-stand but what’s the point of those?
In the past year I’ve purchased my first c-stand, mainly because I had heard about them and didn’t understand the fuss. I thought that some kind of road-test would be the best way of understanding the pros and cons.
I now own multiple c-stands and for many purposes they’ve become my preferred lighting stand. Read on for a rundown on what they are and why they’re useful.
Weight and portability
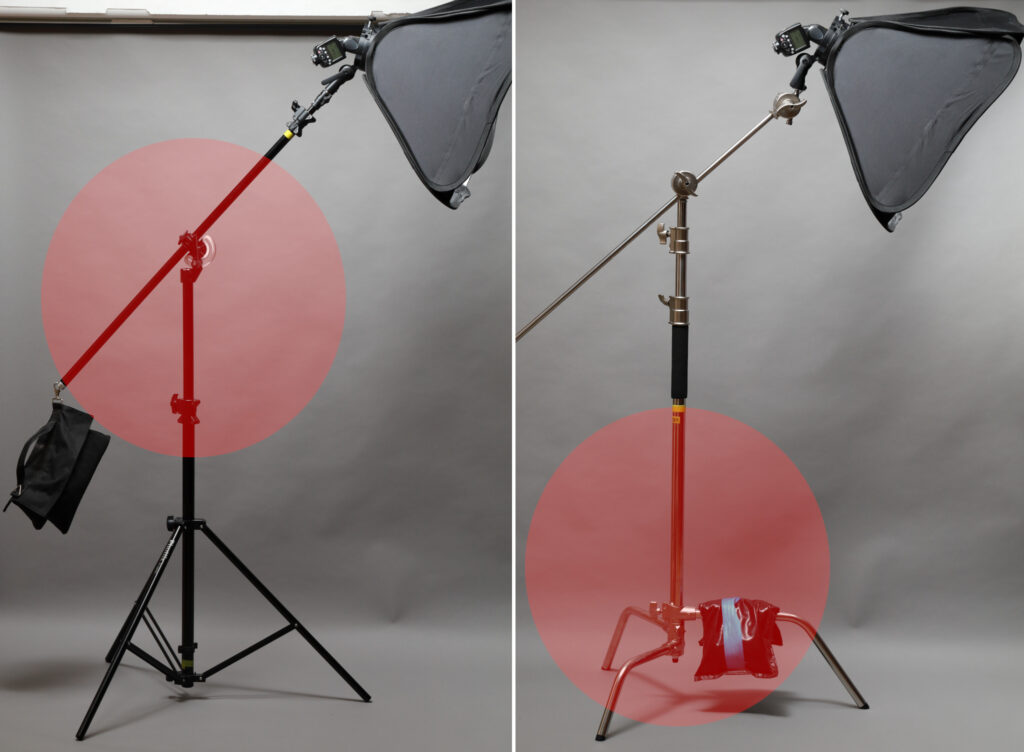
The first thing you will notice about a c-stand is the weight. It’s a heavy and very solid piece of gear, typically 7-8kg or heavier. This is not something you quickly sling over your shoulder to carry to a shoot. The heavy weight is fundamental to the usefulness of a c-stand.
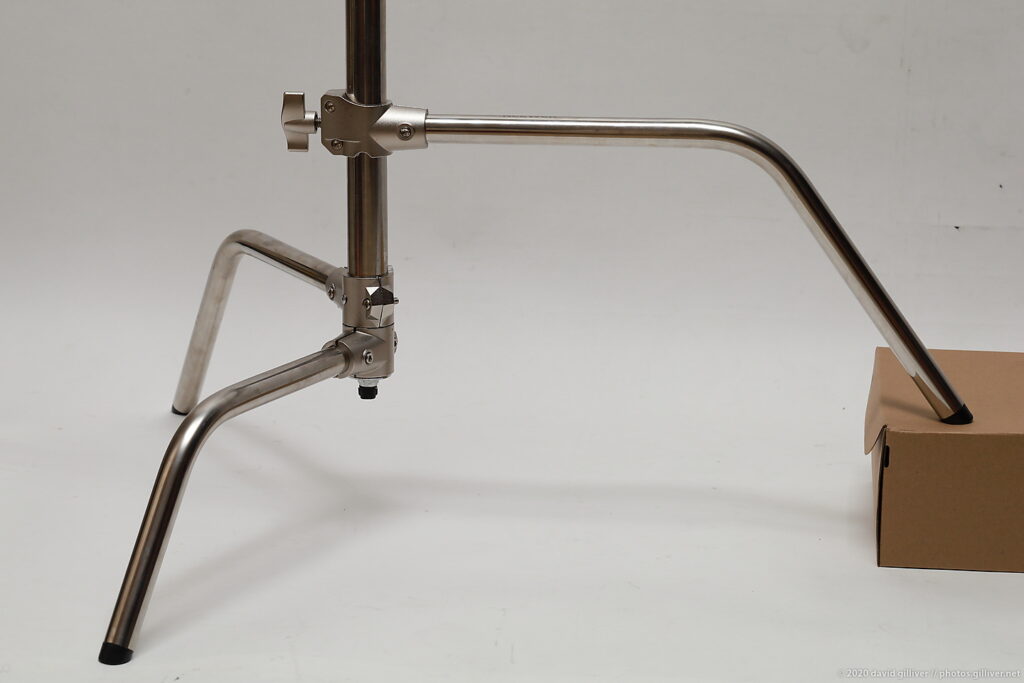
Base/legs
The base legs of a c-stand are noticeably different from a lighting stand. Each leg protrudes at a different height and each has a horizontal section that is perfect for slinging a sandbag over. Placing multiple stands close together is easy because the bases can easily overlap each other. For easy transportation the legs quickly rotate and collapse to flatten.
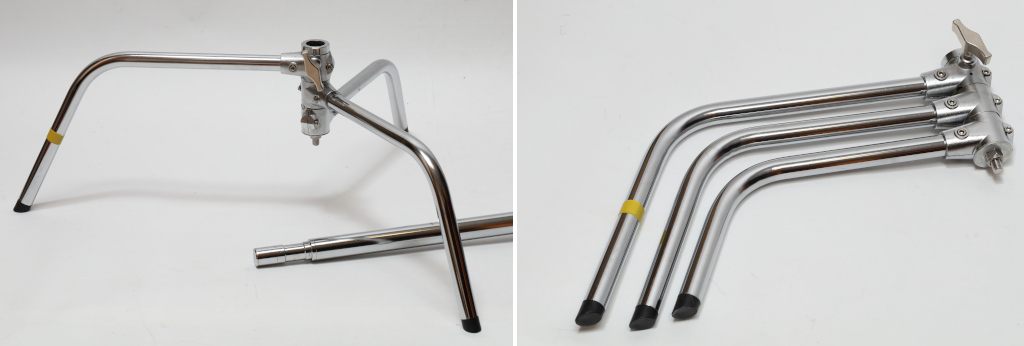
Some c-stands have a removable base (known as ‘turtle base’) so that you can transport the legs separately from the centre column.
The other feature you might see is a sliding leg so that you can use it on uneven ground (eg. stairs). From what I can see, you won’t find a turtle base that has a sliding leg – it’s either one or the other.
While a c-stand is fairly stable anyway, a sandbag is always a good idea. This should be draped over the highest leg so that none of the weight ends up resting directly on the ground. Of course, throwing additional sandbags over the other legs isn’t a bad idea.
Centre column
The centre column of the stand is basically the same as any other lighting stand, except that it’s industrial and heavy duty. It will usually have 2 riser sections so that it can be extended to your preferred height. On top of the column there’s a long mounting spigot but you’re unlikely to place your light on it. A c-stand is all about using the boom arm.
Boom and grip heads
A c-stand is usually used with two grip heads and a boom arm. If you’re buying a c-stand you should make sure these are part of the kit or you will end up having to buy the boom/grips separately.
The boom arm on most stands is about 1m long and has screw mounts on each end. You could attach lights etc directly to these screw mounts but these are limiting in terms of placing a payload where you want it.
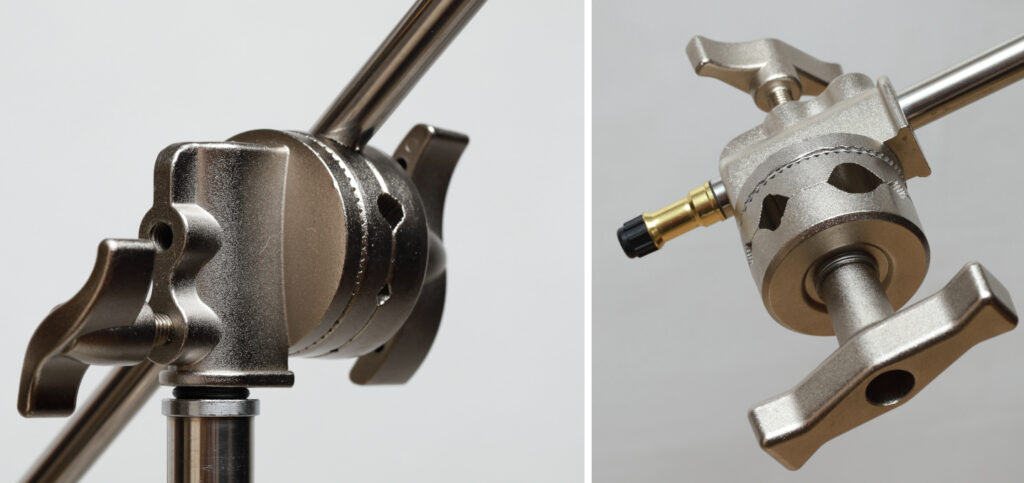
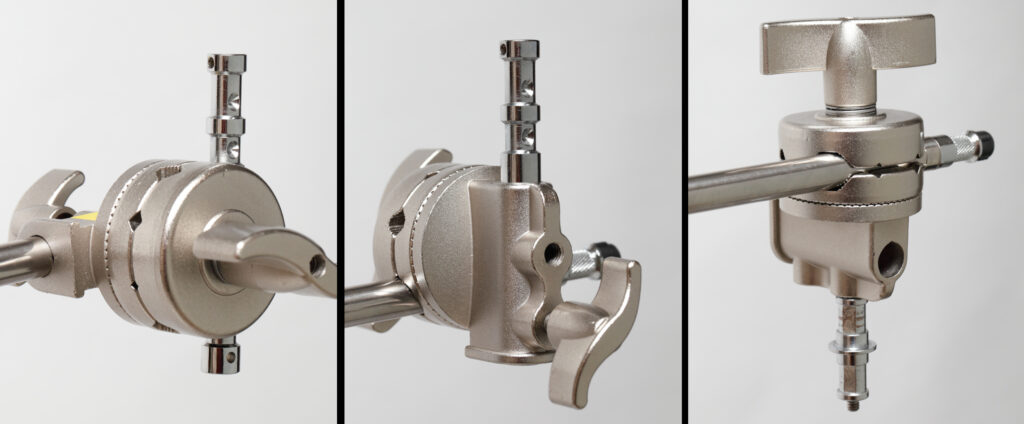
The grip heads are basically clamping mechanisms. One of them sits on top of the stand to hold the boom arm. The other sits at the other end of the boom arm to grip your light or reflector or whatever you want it to hold. Each grip can hold varying thicknesses but can also rotate to adjust the positioning.
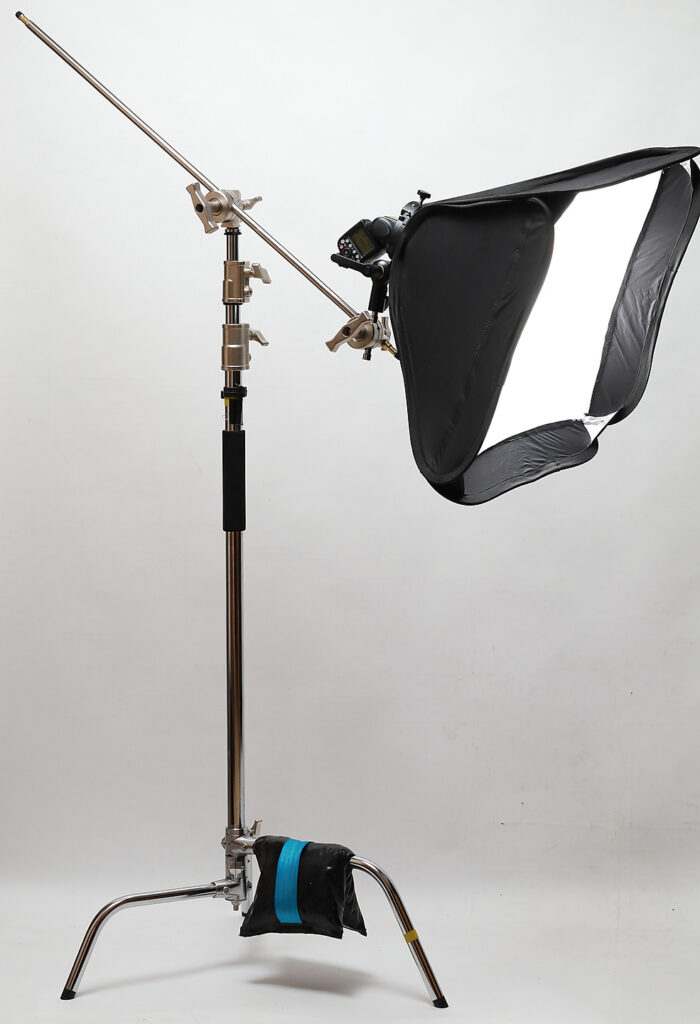
If you’re using a c-stand and not making use of the boom arm, you’re probably not making full use of the stand. The boom arm is what makes a c-stand more versatile than a conventional stand.
Using a boom arm all the time allows you to move the light easily without worrying about having to adjust the stand itself. If you want the light to be low, you just swing the boom arm down vertically. If you want the light to be high, you swing the arm up. You can raise and lower the stand if you like but you won’t be reaching for that adjustment as often as you would with a normal stand.
As the boom arm can slide along the centre grip head, it’s also easy to move your light closer or further away from the stand. With a 1m boom arm, you can basically move the light to anywhere 1m from the top of the stand.
Weight balancing
What sets a c-stand apart from your usual lighting stand is the balance of the weight: the centre-of-gravity is closer to the bottom of the stand. You wouldn’t normally add a counterweight to the boom arm itself. The stability of the stand comes from the solid rigidity and the weight of the base. If you want to to hold something heavy at a height, you just add extra sandbags to the base. Without a counterweight on top, the only weight the stand needs to support is your light. I tend to mostly shoot with speedlights so the weight on my boom arm is particularly easy to deal with.
On a c-stand the boom arm is way more useful than for a traditional stand because re-positioning the light doesn’t need to re-balance a counterweight. You can quickly move the light where you want it and you only have to worry about supporting the weight of the light itself. You still have to be careful though: if you loosen the boom swivel without first supporting the weight of your light, gravity is going to swing it towards the ground alarmingly quickly. It’s important to grab your light before releasing the grip head.To provide the most stable support, there are two key rules in setting up your c-stand:
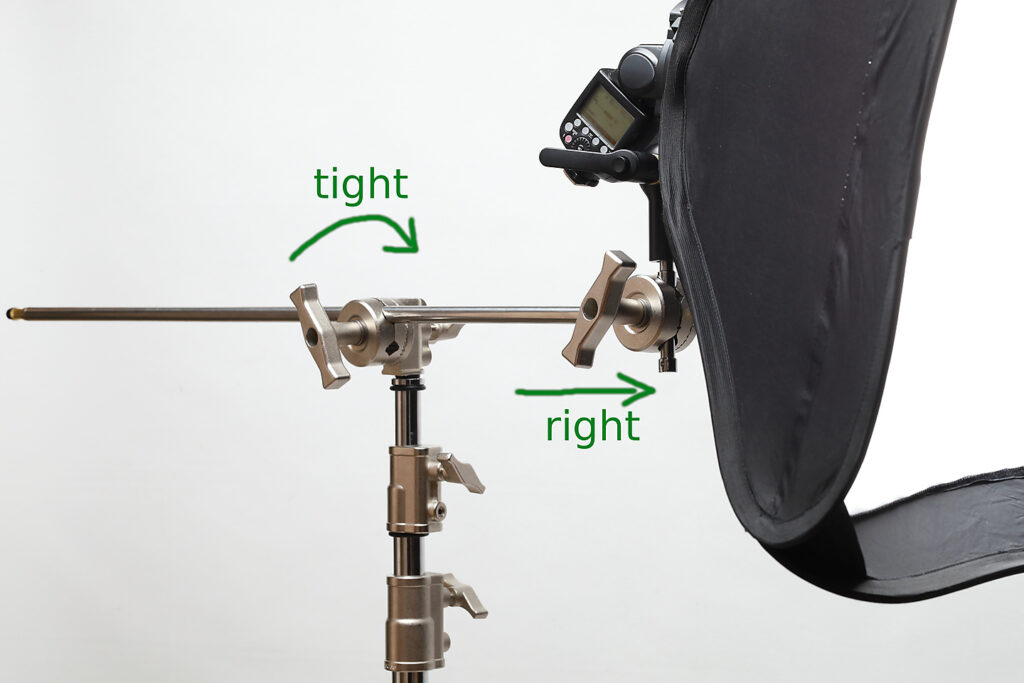
- The weight on the arm should be applying force to tighten the hold on the boom arm. Obviously, you don’t want the weight of your payload pushing down to unscrew it so that your light hits the ground. Tightening the grip head requires a clockwise rotation. The popular way of remembering this is the phrase “righty tighty, lefty loosey”. If you really need the light placed on the left of the stand, simply swing the boom arm around the stand horizontally so that the tightening knob is on the opposite side.
- The weight on the boom arm should hang over the tallest leg of the stand. While the considerable weight of the stand adds stability, that doesn’t mean it’s impossible to tip over with bad placement. The tallest leg is used because it’s the longest leg and has the widest reach from the centre column.
You’ll want a ‘baby pin’
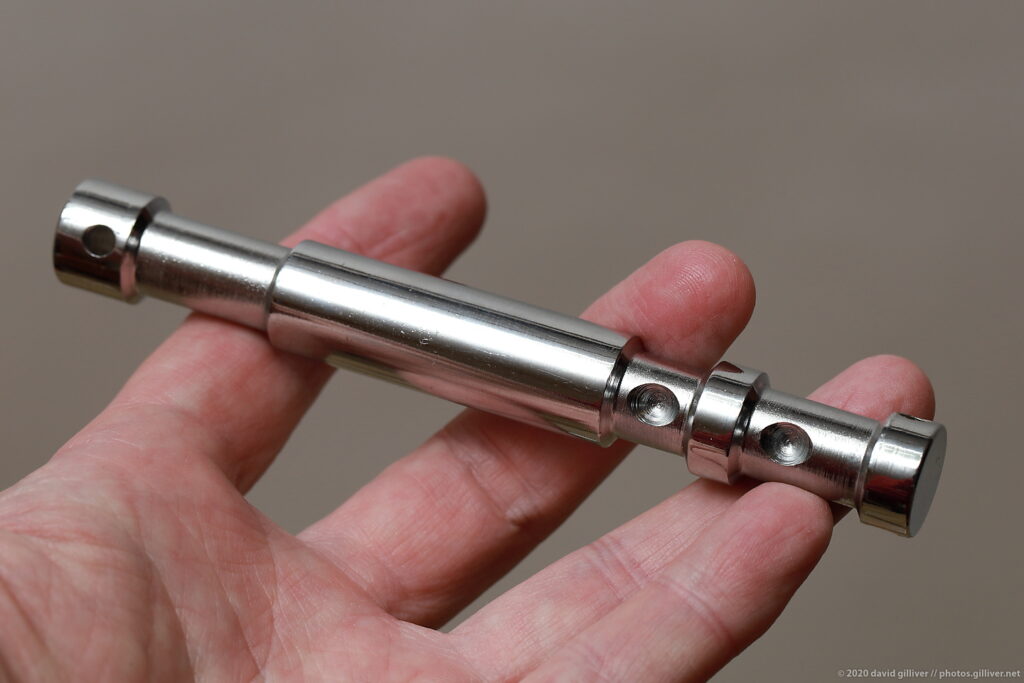
Many c-stand kits are sold with the legs, telescoping column, a boom arm and two grip heads. To get the most out of your stand you’ll need something like a baby pin.
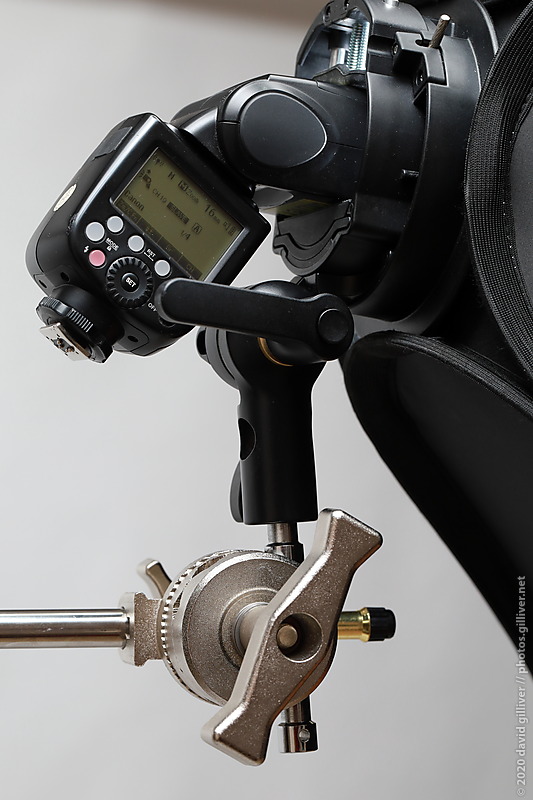
This can be used to solve a simple problem: on the end of the boom arm there’s a spigot stud but it’s fixed to the arm. If you want to able to rotate your light in any direction it just can’t do it. The grip head is designed to rotate but it still needs something to hold.
The baby pin is simply a longer-than-usual spigot that you install into the grip head. Once installed, you will be able to make full use of the swiveling grip to rotate your light around the axis of the grip or the axis of the pin itself.
Baby pins aren’t expensive (about $AU10-20) so I’d say there’s a good argument for retailers to include them in a c-stand kit. You can use a c-stand without one but it makes the grip head on the boom arm way less useful. When I bought my first c-stand, the retailer didn’t sell baby pins and I had to drive around to a few other retailers before I found one.
Mounting other items…
The design of the c-stand fascinates me because it looks simple but it has clearly been designed to offer maximum flexibility in how it can be used. For instance, one side of the grip head has two screw holes, one of which has a tightening knob. Both of these screw threads are the standard 3/8” size thread so you can screw attachments into either hole if required.
If you’re just mounting a light on the stand, you would just use a combination of grip head and baby pin. If you want the stand to hold something else, you may be able to just grip that item directly with the versatile grip head. This could be a sheet of corflute or a 5-way reflector.

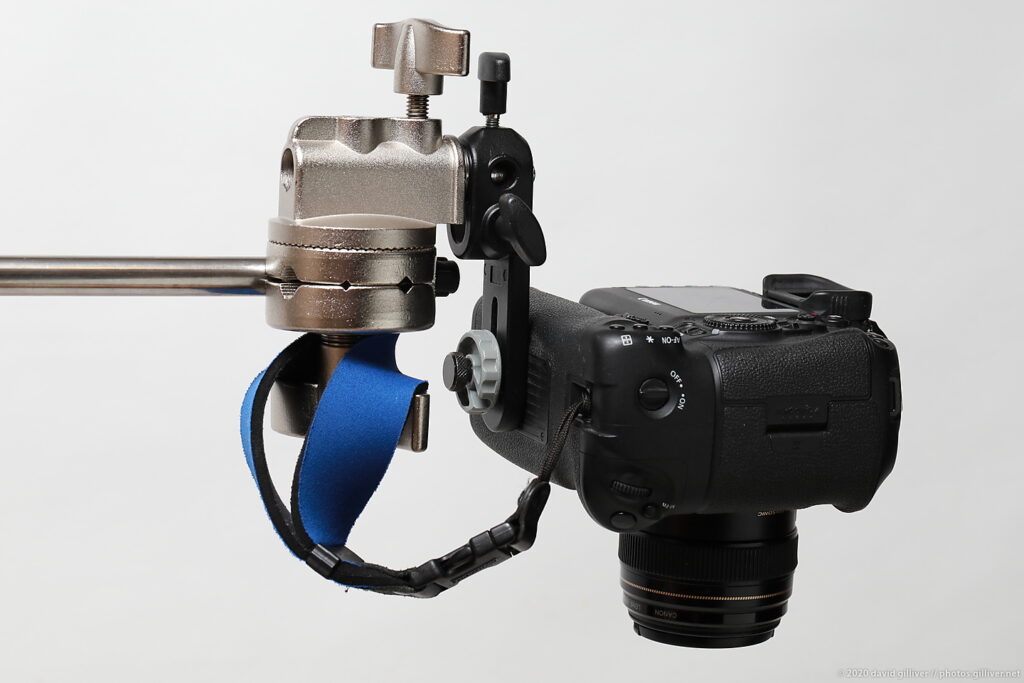
If you’re shooting flatlay, the boom arm is ideal for mounting the camera on and can be raised higher than a normal camera tripod. You could simply attach the camera with a spigot screwed into it but you could also use some kind of tripod head for more flexibility.
Buying a stand…
You probably won’t find c-stands in your local camera store as they’re not something the average photographer needs. You would need to find your local professional store that sells location/studio equipment such as lights, stands and backdrops. Where I live in Melbourne that would be stores like Arahan Photo, Vanbar, Kayell, Borge’s Imaging, Image Melbourne, Protog, Specular or Dragon Image. I have also seen occasional cheap deals on Amazon.
c-stands come in different sizes so it’s worth checking the maximum height of the stand and the length of the boom arm. Make sure you buy a kit that includes the boom and grip heads. Look for a stand that has turtle base or sliding leg depending on your preference. I own 40” stands of both types. Don’t forget to pick up a baby pin.
In conclusion…
A c-stand isn’t for everyone. If travelling light is important to you, a c-stand is likely to be too big and heavy. If your budget is tight, you’re unlikely to want to spend this much on a lighting stand.
On the other hand, a c-stand is perhaps the most useful lighting stand you can buy. In a studio environment, the industrial rigidity and practical flexibility make it incredibly useful.